Looking at how to create a website for your digital marketing needs?
Websites are the cornerstone of digital marketing efforts. While it is good to have social media accounts such as Facebook, Instagram or YouTube, these platforms are not yours to begin with and you have no control over algorithm changes or worse, if the platform decides to close your account. In comparison, creating a website for your business, is a better business decision.
Why Do You Need a Website? Why Not Just Rely on Social Media?
A website for your company gives you credibility and becomes a hub for your digital marketing campaigns. You’ll be able to showcase your work and testimonials from clients. Furthermore, when you invest in creating high quality content for your site, you will get the benefits of Search Engine Optimization (SEO), which gives a compounding return to your business. The more you invest in content and link building, the greater the traction will be for your site.
As a web developer and a digital agency owner, I’ve run digital marketing campaigns for clients, some with a website and others without. Having a website helps us get better results and conversions, as the website becomes the hub of our digital marketing efforts.
Read: 10 Reasons Why You Need a Website
TL;DR : How to Create Your Website Fast
If you’re short of time, and just want to create a website fast and at a low cost, all you need to do is just follow these two simple steps:
1) Sign up for Dreamhost. – Head over to Dreamhost and select their Shared Starter plan for only $2.59 per month. Granted it is three years, but it is one of the best shared hosting deal out there. Furthermore, you will get a free domain name too.
2) Install WordPress – Dreamhost has an easy-to-use, one-click WordPress installer. After installing WordPress, you can either look for a free theme to install or just get started on your digital marketing journey with the pre-installed theme.
And when you want to improve your site or the site’s performance and security, read our guides and reviews.
How to Create a Website (The Step-by-Step Guide)
In this guide, we will show you how to create a website, easily and at a low cost. While it isn’t free, you can certainly save a pretty sum compared to hiring a web designer. Bear in mind though, if you have the budget, an experienced digital agency will be able to create a much more effective site. However, if you are tight on cash and need to run like a startup, the following steps will help you create an effective and beautiful website, fast.
Step 1: Find the Right Domain
What’s a Good Domain Name?
Finding the right domain can be as simple as using your personal name as the domain, or finding a domain that describes your brand. We don’t recommend getting a product specific domain (e.g: betterhaircut.com), as that limits you from expanding beyond the niche.
Furthermore, it might be prudent to stay away from putting in tech product names in your domain (e.g: cdrking.com), as these products might be obsolete in the future. You’ll then need to switch to a new domain and rebuild your domain authority all over again.
I recommend keeping your domain name relatively short and easy to remember, rather than trying to cram in a couple of keywords in the domain. If you need some ideas, Domain Wheel is an interesting name generator.
When you’ve decided on your domain name, it’s time to head over to Dreamhost for your hosting needs and get your free domain.
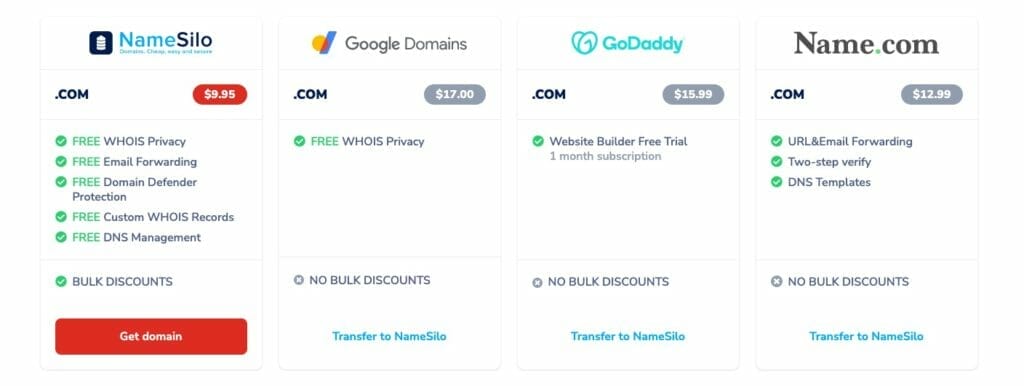
If you prefer to buy directly from the domain registrar, we recommend either NameSilo or NameCheap.
Step 2: Use Dreamhost for Web Hosting & Domain Registration

DreamHost is our recommended shared web hosting plan, as it is cheap and gives you reasonable performance, backups (8 backups) and security. It is also one of the most value for money hosting in the market.
DreamHost vs Bluehost
Compared to Bluehost which other guides recommend, we prefer DreamHost due to its better performance, speed and security. If you plan to get any work done, DreamHost is the way to go.
While you will eventually need to upgrade to a managed Virtual Private Server (VPS), DreamHost’s Shared Web Hosting, lets you launch quickly, validate your business idea and get funds to upgrade to a better server when your business have gained some traction.
DreamHost also comes with a free domain for 12 months when you sign up for their yearly package. Domain registration can also be done via NameSilo, though that means you won’t be getting a free domain.
DreamHost vs Some Local Shared Hosting Company in Your Country
You might find that your local hosting provider advertises itself as the best thing since sliced bread. Don’t believe them. They simply do not have the scale to compete with specialized shared web hosting providers like DreamHost.
Step 3: Install WordPress through DreamHost
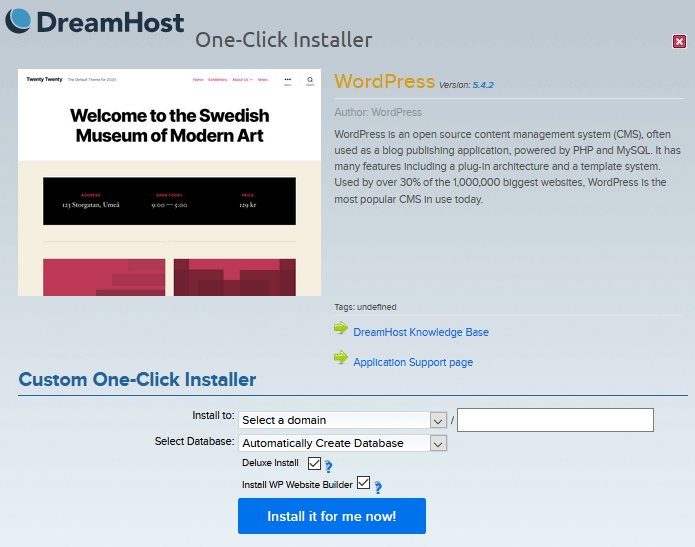
DreamHost comes with its own control panel, the DreamHost panel, which can be confusing to you if you are used to cPanel. However, DreamHost comes with a one-click WordPress installer, which makes it easy for you to quickly launch a site.
When installing WordPress via DreamHost, select the ‘Deluxe Install’. This installs a selection of free themes to your site, including
- Astra
- Blocksy
- Hello Elementor
- Neve
- OceanWP
- Ultra
DreamHost’s Deluxe Install, also installs a nifty selection of plugins, including
- Akismet
- All In One SEO (AIOSEO)
- WP Super Cache
- WPForms Lite
Finally, the Deluxe Install adds a well needed protection against execution of scripts on your WordPress uploads directory.
Step 4: Design Your Website with Premium Themes
Now that your site is up, it’s time to switch from the default theme. The themes installed by DreamHost’s Deluxe Install are among those that we highly recommend. You won’t go wrong with Astra, Blocksy, Neve or OceanWP.
If you want an alternative, GeneratePress, Kadence, Page Builder Framework and Zakra are good too.
I recommend getting the premium version of the theme as it usually comes with more settings, prebuilt templates and support.
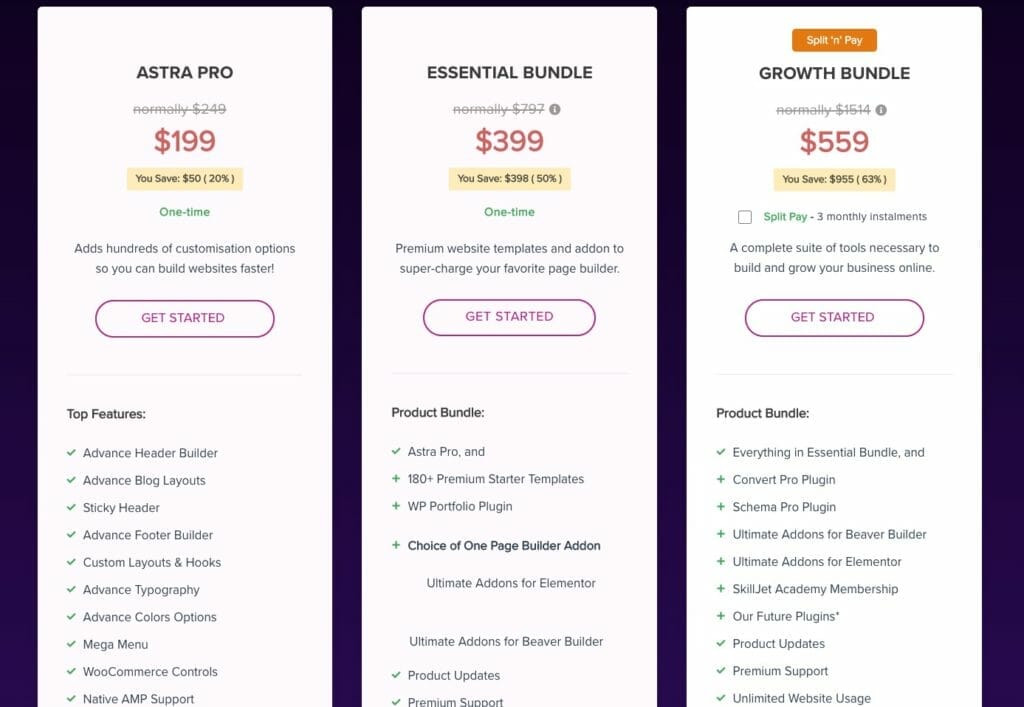
From experience, Astra has the most amount of prebuilt templates that you can easily install with the theme. Not all templates are free though, and some require you to purchase the premium version of Astra, the Astra Pro theme.
If you are new to WordPress, consider getting Astra’s Growth Bundle. It comes with some powerful plugins that enhances your site, making it a value for money outlay. These includes:
- Convert Pro – A powerful newsletter plugin that is under constant development. It integrates with a host of email service providers and CRM including my favourite, MailPoet. It also has Zapier integration, making it really powerful.
- Schema Pro – Schema Pro enables you to map schema to specific pages, easily. This helps search engines such as Google, understand the content on your site better.
- Ultimate Addons for Elementor & Gutenberg – Yes, I like Elementor. While Gutenberg is the future of WordPress, Elementor is the present, and Astra’s Growth Bundle ensures you are well covered with additional features and widgets for the Elementor Page Builder.
Step 5: Which WordPress Page Builder should You Choose?
Having tested all major WordPress Page Builder plugins for actual client work, we recommend the premium version of Elementor, Elementor Pro.
Elementor is easy to use and adjust, letting you quickly adjust the prebuilt template from Astra or some other theme you choose. With Elementor Pro, you can get even more templates via sites such as the Landing Factory, Crocoblock and Templately, among others.
However, if you prefer to focus on speed, the Gutenberg Editor paired with plugins such as Stackable and GenerateBlocks Premium, can work. It is harder to design something nice with Gutenberg, but if all you want is a simple site and to future proof your site, you won’t go wrong with the Gutenberg Editor.
If you are hardcore and don’t mind putting in more effort in learning how to use the page builder, the Oxygen Builder might be better for you. The sites built with Oxygen Builder usually load faster than Elementor Pro sites. This means, you spend less time trying to do well with Google’s Core Web Vitals.
Step 6: Build Your Website’s Architecture
If you are like me and want the easy way, just install the prebuilt template (or Starter Site in Astra), edit the content and you’re good to go.
Otherwise, you will need to design your website’s main pages. This include the homepage, about us, contact and perhaps the product or gallery page. I would also recommend having a dedicated blog page, which will help your website’s SEO in the long run.
Web design is hard work and to do a proper design, you might want to consider signing up for some web design courses to up your design skills. My favourites are:
- Laura Elizabeth’s DesignAcademy
- Mor Cohen’s DesignClass
- Vako Shvili’s Complete Web Design (purchasable on Udemy)
I would recommend just using the prebuilt template in order to launch fast and test your ideas. You can always redesign the site once your business gets some traction.
Step 7: Connect Your Web Pages with Menus
Once you have your website’s architecture ready, connect them to your website’s header via creating a menu. With WordPress, you can create a menu via the Appearance menu on the left hand site of the admin page.
Add the menu to the header via the WordPress customizer and your web pages are now connected!
Step 8: Create Compelling Content for Your Website
If you have installed a prebuilt template, it would come with dummy text such as ipsum lorem. Craft your content to educate potential customers on your products or services.
I would advice spending time on your About page, as that is one of the most visited pages on your site. Include things such as background information, photographs and even why you started the site.
If you are a niche deemed by Google as high stakes (otherwise known as YMYL, Your Money Your Life), the About page matters.
Niches that fall under the YMYL category include legal, medical, government, finance and shopping.
Your About page will also help with your website’s EAT (Expertise, Authoritativeness, Trustworthiness). While E-A-T is measured on a page level, you can always link your author’s biography to your About page, which helps with the scoring.
Once your have the main pages of your site populated, your site is ready to launch. Your blog posts can come in later, but to finish up the site, let’s look at some useful plugins to enhance the site.
Step 9: Choose and Install Useful Plugins
The strength of WordPress is in the sheer number of free and paid plugins available. While WordPress is a good Content Management System (CMS) out of the box, the right plugins will transform your site from just a CMS to a powerful online store. Or a better CMS that helps you do well with search engines such as Google.
I won’t list too many plugins, lest you get overwhelmed. If you are looking to enhance your site further, read our best plugin guides.
- Contact Form – Fluent Forms Pro. While most sites will start off with Contact Form 7 or WPForms Lite, we recommend getting Fluent Forms Pro. It’s a powerful yet lightweight WordPress contact form plugin from a reliable team, WPManageNinja. Fluent Forms is improving rapidly and is one of the best forms for WordPress. It also comes with a lifetime license, which can save you money long term.
- Email Opt-in and Lead Generation – Convert Pro. Another plugin on lifetime, Convert Pro straddles the line between affordable and powerful. If you have bought the Astra Growth Bundle, you would have very useable email marketing plugin that can help grow your email list. And you should invest in growing your list, as emails are not subject to regular algorithm changes, unlike social media platforms nor search engines.
- Search Engine Optimization – Rank Math Pro. While most people would recommend Yoast SEO, I differ. Having tried out a number of SEO plugins, Rank Math Pro is our recommendation. It comes with innovative features such as Instant Indexing, which uses the Google Indexing API to give you an unfair advantage over your competitors
- Caching – WP Rocket – I highly recommend WP Rocket as it is an easy-to-use caching plugin that performs really well out of the box. WP Rocket frequently ranks as one of the fastest caching plugin for WordPress, in a field filled with luminaries such as Swift Performance Pro and W3 Total Cache. Unlike the latter two plugins, WP Rocket doesn’t have bunch of options you need to test and tweak in order to do well.
- Google Analytics, Google Ads Retargeting & Facebook Pixel – PixelYourSite – While you can install a couple of plugins to do handle your analytics and ad requirements, PixelYourSite does it all. And if you run Facebook Ad Campaigns, PixelYourSite’s ability to use Conversion API (CAPI), will get you better results for your site or online store.
You Just Made Your First Website! What Next?
Your website is now ready. If you are running Facebook Ads, look at how to improve your user experience (UX) via Conversion Rate Optimization (CRO) tools such as Hotjar and Plerdy.
Your user journey matters. In one recent project for a cake shop client of mine, we improved the Return of Ad Spend (ROAS) drastically by redeveloping the site based on reports we got from Plerdy.
If you are running Google Ads, seek to improve your Quality Score by ensuring you have relevant keywords on your landing page. You might need to tweak your landing page to make it easy to navigate. Furthermore, you might want to switch to a VPS hosting provider later, as site speed matters to Google’s Quality Score.
If you plan to make Search Engine Optimization (SEO) as part of your digital marketing plan, look at crafting evergreen, useful blog posts that other sites will want to link to. Try having a writing schedule and stick to it, in order to grow your site. And when you have the budget, sign up for SEO Tools such as Ahrefs and Accuranker, as these tools will help you grow your newly created website / online store.
Frequently Asked Questions
1) How Much Does a Website Actually Cost?
2) Which is the Best Website Platform? WordPress vs Webflow vs Wix vs Squarespace
For one, WordPress powers millions of websites globally. In comparison, there’s no other Content Management System (CMS) that comes close to WordPress’ numbers.
Furthermore, as these are hosted solutions, they limit your site’s growth as additional features are either not available or as an expensive subscription. And the cost can easily balloon the more extensions you activate.
In comparison, WordPress plugins are either available on lifetime licenses or yearly renewal. Plus, if you have the budget and a specific requirement, you can always hire a web development team to custom develop the plugin you need.
3) Shared Hosting vs VPS Hosting: Why Do We Recommend Shared Hosting? When Should You Upgrade to VPS Hosting? How about Dedicated Hosting?
Once your site gains traction, it’s imperative that you move to a VPS hosting or better still, get a Website Care Plan with a digital agency. A VPS hosting is isolated, ensuring you won’t be affected if another site on the server is compromised.
The Website Care Plan will handle the following maintenance, letting you focus on your digital marketing campaigns:
a) Keep your plugins and theme updated weekly via a managed WordPress update.
b) Keep your site safe and secure via Cloud Web Application Firewall (or Cloud WAF for short), antivirus and backups to a secure cloud storage such as Amazon S3.
c) Handle the technical support for your site, in case anything breaks down. Plugins might break down or clash with other plugins after running the updates. Some agencies will have a ticketing system and emergency phone number, just in case something breaks and needs urgent attention.
d) Enhance your site via the Agency’s own premium plugin licenses. As an agency, we save our clients thousands of dollars per year, as we use our agency licenses on their sites.

